Group Roles and Permissions
With large sites there is often a need to have a subset of the content managed by a specific list of users. Think of a large agency or department with sub-departments or programs that produce content. With DKAN’s groups, you can silo content and users so that the different departments can easily manage and control only the content they are producing.
Group-level permissions give users the ability to do things they couldn’t necessarily do on the site outside of the Group. Read more about group permissions here.
Add Group Members
As a site manager, there are two ways that you can add a user to a group: from the user profile, or from the group page.
Add a user by editing their user profile:
- Click “People” in the administration menu at the top
- Click “Edit” on the user’s profile who you want to add to the group
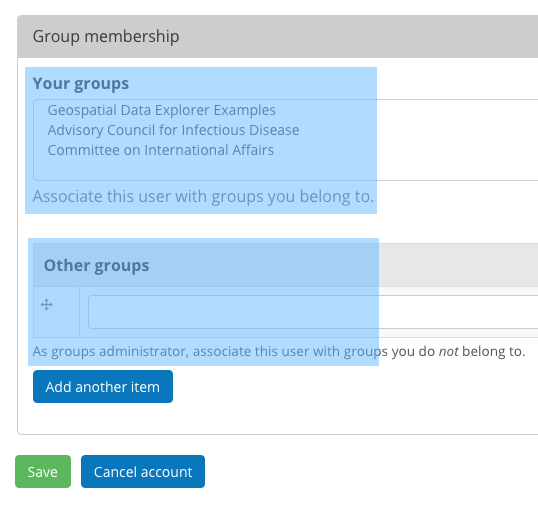
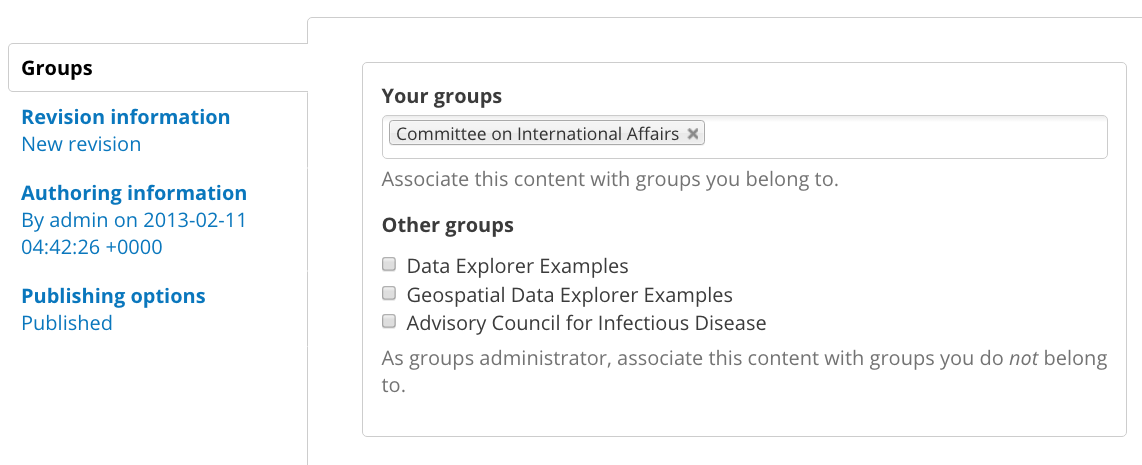
- Scroll to the bottom of the page. In the “Group membership” section there are two fields, “your groups” and “other groups”.
- Your groups: These are groups that you are a member of. Users are not automatically added to groups, so groups won’t appear in this field unless you add yourself to a group.
- Other groups: These are simply groups that you are not a member of. As a site manager, you can add any user to a group regardless if you are a member yourself. But the group names will not automatically appear like in the “your groups” field, so you will have to know the name of the group to enter it in the “other groups” field.
- Once the groups have been selected, click the Save button at the bottom to submit the requests.
Add a user from the group page:
- Click the “Group” button at the top of the page
- Click the “Add people” link.
- Begin typing an existing a user into the “user name” field. A list of autocomplete options will appear. A user must already have an account to be added to a group, so if a person needs to be added you should first create a site account for them with the appropriate role.
- By default, a user will only have a Member role in the Group. If you want the new user to be able to manage the content and users of the group, check the “administrator member” box.
- Finish by clicking the “Add users” button at the bottom of the page.
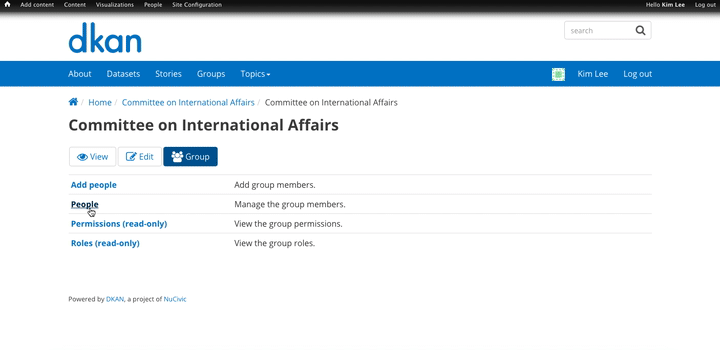
In the example below, the site manager goes to the group “Committee on International Affairs”. From the group page the site manager adds a new user by typing the user name and choosing the correction option in from the autocomplete. In this example, Kim Lee should be an administrator member of the group so the site manager checks the administrator member box.
Manage Group members
You can manage group members directly from a group’s home page by clicking the “Group” button. From this page you can manage existing members by clicking the “People” link. The Group overview page lists all the members of a group including pending members. From this page you can see how many members are in the group overall, the number of datasets associated with the group, access and edit individual member profiles, perform bulk actions and manage membership requests.
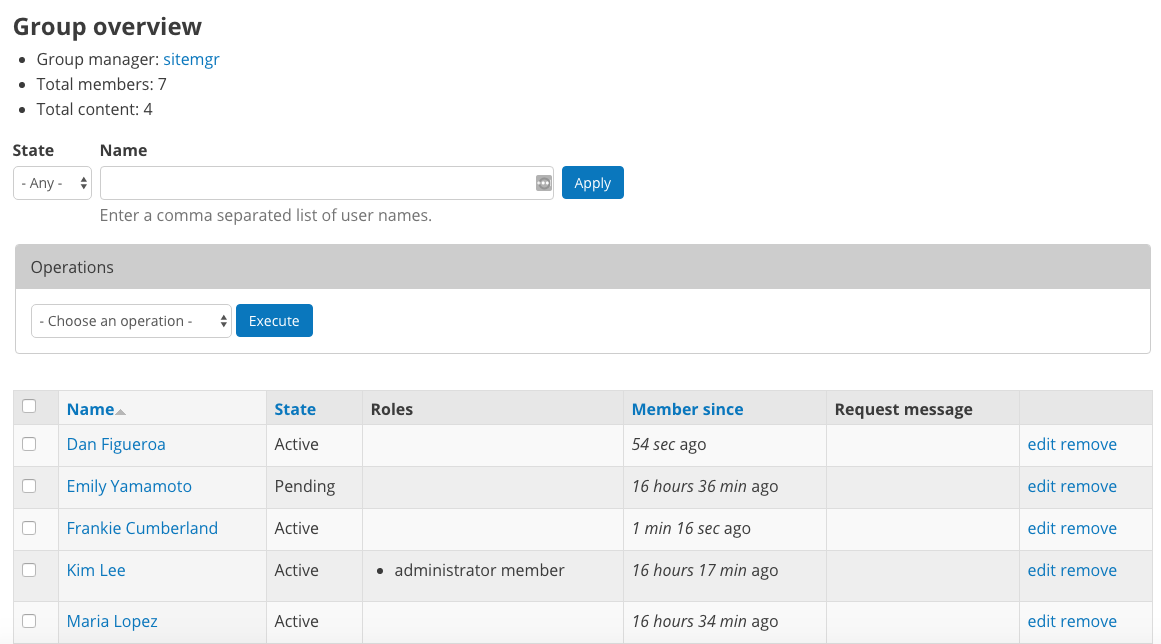
Find members: All the members of a group, including pending members, appear on the members list. There are two ways to find members: by “state” and by “name.”
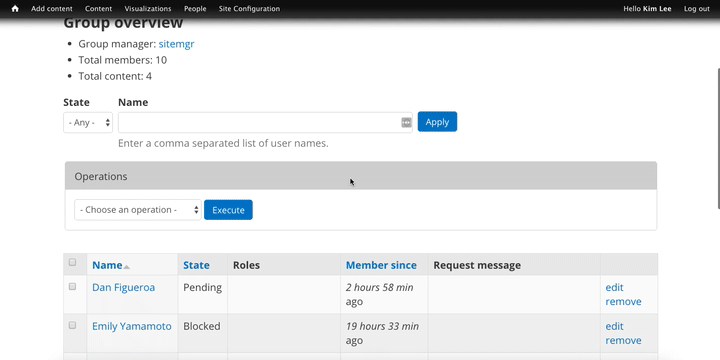
- State: “State” refers to the status of a member. Active members are users who regularly add datasets to the group. Blocked members are unable to add datasets to the group and are not able to request membership. Pending members have requested to join the group and are waiting for approval from the group administrator. Use the “State” drop-down menu to find users who fit a common state. This is helpful when you want to perform bulk actions on multiple users at the same time.
- Name: Finding a member by name is a much more specific type of search. You can search for multiple members at the same time by entering the user names in the Name search field separated by commas. This type of search is helpful if you know which specific member you’re looking for or if there is a specific group of members that don’t have a common state but you want to perform a bulk action on that group of members.

Change a user’s role: As a site manager you can change the role of a group member to either be a regular member or an administrator member. Administrator members have full control of the group, its members, and its content so be sure these are trusted users.
From the Group’s home page, click the “Group” button and then the “People” link to manage the group members.
Remove or block a member: You can keep users from adding _datasets_ to the group in two ways: blocking a member or removing them from the group.

- Remove a member: Removing a member keeps them from adding content to the group, but these users can later request membership. To remove a member, access the group overview page where group members are managed. Find the member you want to remove and click the remove link in the furthest column to the right in the member’s row of information.
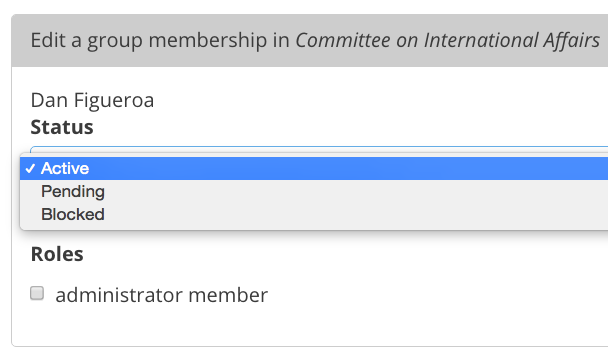
- Block a member: Blocking a user keeps the user from adding content to the group, and these users cannot request membership to the group. To block a member, you’ll need to change the status of the member by editing their profile. Find the member you want to block and click the edit link in the furthest column to the right in the member’s row of information. From the drop-down Status menu, change the member’s status from “active” to “blocked”.
Membership requests: Users may also request to join a group. When users submit a membership request, they appear in the list of members with a pending status. If the user entered a request message, it will appear here as part of the member profile (only visible to the site manager and administrator members).
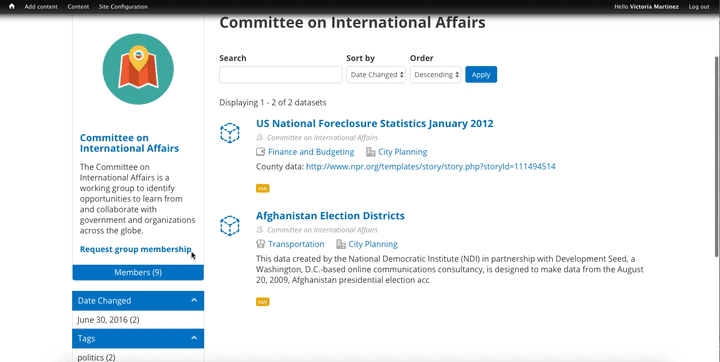
In the example below, a non-member visits the group’s home page and submits a request for membership with a request message. The member and her message will now appear on the list of members on the group overview page in a pending state.
The group administrator or site manager can approve the request by changing the user’s status from pending to active. To change a member’s status, click the edit link in the furthest column to the right in the member’s row of information. From the drop-down “status” menu, change the member’s status from “pending” to “active.”
Membership requests don’t send alerts to the group administrator, so the administrator needs to check for members with a pending state. You can find members by state and select pending to show only pending members who need approval.
Bulk actions: Bulk actions help save time because you can select multiple members and perform an action on all of them at once rather than performing the action on each member one at a time.
From the group’s home page, click the “Group” button and then the “People” link to manage the Group members.
Find the members you want perform the action on and check the boxes to the left of the member’s name for each member. There are three types of bulk actions: “Modify OG user roles,” “Remove from group,” and “Modify membership status.”
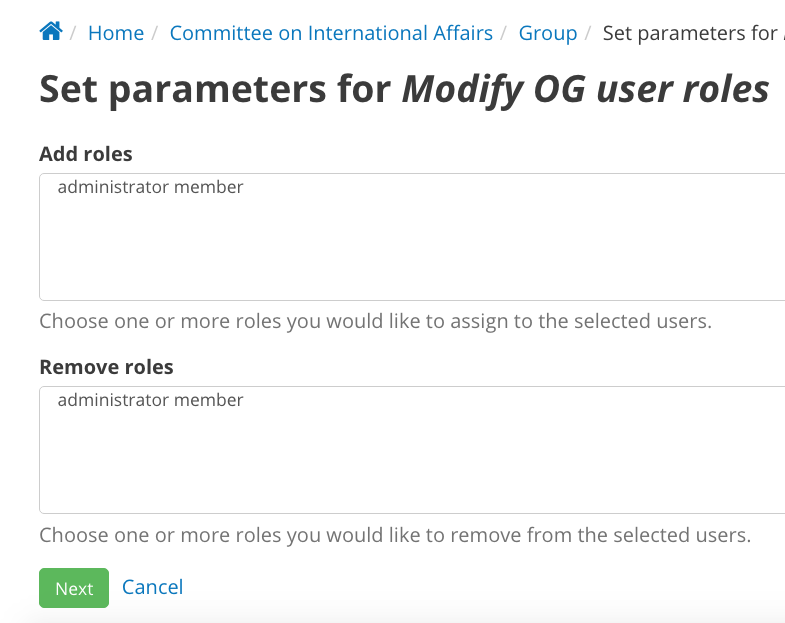
- Modify OG user roles: OG user roles refer specifically to group roles and permissions, which are “Member” and “Administrator Member.” You can change the role of multiple members at the same time with this action. Check all the members whose roles you want to change–for this action, all the members must have the same role to be changed to a new role. Find the drop-down “operations” menu, select “Modify OG user roles,” and click the “Execute” button. On the next screen you can choose to either add the “Administrator member” role to the selected users or remove the “Administrator member” role to make the users general members. Click the “Next” button at the bottom of the page and confirm the change on the next screen.
- Remove from group: Remove several members at once with this bulk action. Check all the members who you want to remove from the group, find the “Remove from group” option on the drop-down “Operations” menu, and click the “Execute” button. You’ll be asked to confirm on the next page and then the members will be removed from the group.
- Modify membership status: Members in a group may have one of three statuses: “active,” “pending,” and “blocked.”
- The “active” status means that the member is able to add datasets to a group and edit datasets that they have created.
- Pending members are waiting for approval from the group administrator.
- Blocked members exist but are not active and do not have permission to add datasets to the group or submit another request for membership.
- Check all the members for whom you want to change the status. For this action, all the members must have the same status to be changed to a new status. Find the drop-down “Operations” menu, select “Modify membership status,” and click the “Execute” button. On the next screen, choose the new status and then confirm the changes.
In the example below, the group administrator (Kim Lee) first finds only members with a pending status using the “State” drop-down menu. Then she selects all of the members and chooses the bulk action “Modify membership status” from the drop-down “Operations” menu. On the next screen, she changes the members status to “active.” This is an example of an easy way to find and approve membership requests quickly using search functions and bulk actions.

More on Group Membership
Requesting membership and unsubscribing from a Group
Users can request to join a group by clicking the “Request group membership” link on the group home page. A site manager or administrator member must approve the request for the user to become an active member.
Active members, both members and administrator members, can leave the group by clicking the “Unsubscribe From Group” link on the group home page. Once members are removed or leave the group they can no longer add content to the group. Users with the “site manager” role do not need to be members of a group to add content to the group.
Associating Datasets to specific Groups
In general, your group members will publish datasets associated with the group, so adding will be more common. On occasion, a dataset may be added to a group that does not belong and should be removed (though not deleted).
Add a Dataset: Datasets should be added a group as part of the initial content creation process of the dataset. As group members add new content to the site they should associate the dataset with the group before finally publishing. Users who created the content can later edit the dataset to add to a group, and as a site manager you can add any dataset regardless of the author. Once the dataset is published and associated with the group, it will appear on the group’s dataset list. Read the section Adding a Dataset to find more detail on how to add a dataset to a group.
Remove a Dataset: Though datasets appear on the group’s home page once a dataset is published and associated with the group, they are not managed within the group. To remove a dataset, the content author, administrator member, or site manager needs to edit the dataset directly and remove the group associated with the dataset. Once the group is removed from the dataset it will no longer appear on the group’s dataset list.